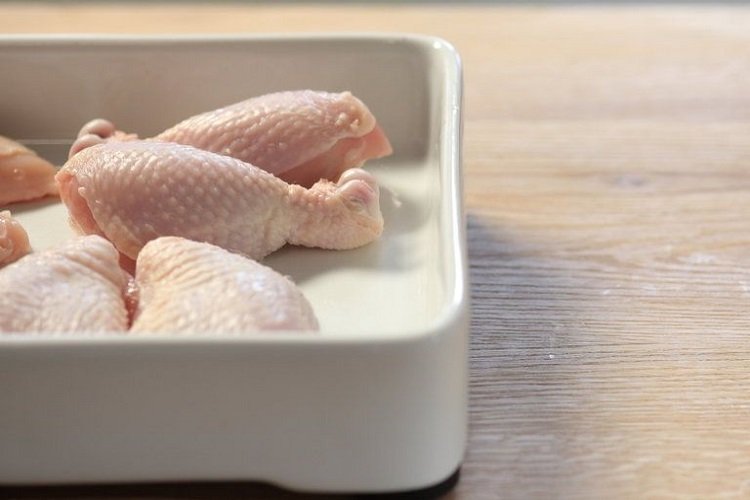

When buying fresh chicken, there are several things to keep in mind. It’s important to choose fresh chicken of good quality and to select the right cut for your recipe and cooking method. When shopping for fresh chicken, please pay attention to the color and appearance of the meat to ensure it is fresh, and check the expiration date to ensure it has not expired. (Also see A Guide to Basic Meat Butchering Techniques for Home Cooking)
There was a time that supermarkets sold only one or two types of chicken, but these days your chicken buying options at supermarkets are seemingly unlimited. Should you buy whole or specific chicken parts such as breasts, legs, wings, or thighs? The whole chicken will be cheaper per pound but require more work in butchering. Is the convenience of pre-cut chicken worth paying more? (Also see From Garden to Table: The Gordon Ramsay Guide to Cooking with Fresh Herbs)
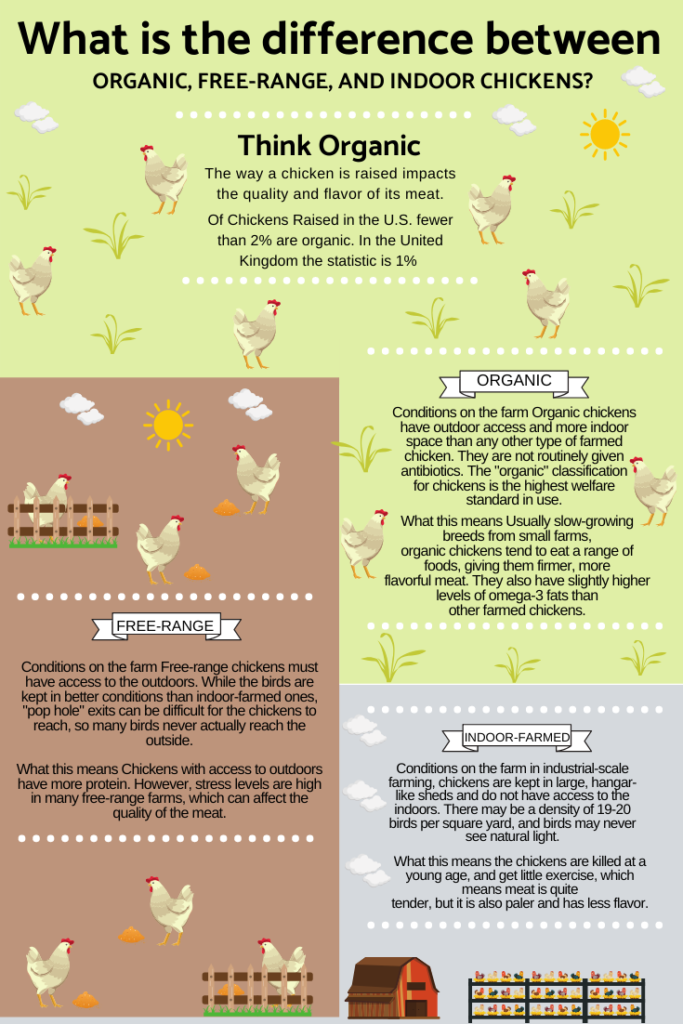
The next step is deciphering terms like “natural,” “organic,” and “air-chilled,” Whole chickens or cut chickens that have these terms on their label tend to be more expensive, is the higher price justified?
By following these guidelines, you can purchase fresh chicken that is delicious, safe, and meets your personal preferences.
How to Cut Up Whole Chicken
You’ll learn everything you need to know about preparing a whole chicken, from buying and breaking down a chicken into parts, to how to butterfly and truss a chicken. I will also go over boneless chicken breasts, cut them into fillets, and cut them into fragile pieces called cutlets.
After reading this guide, you will become more comfortable buying and butchering a whole chicken.
How to Read Supermarket Labeling
Many claims cited on chicken Labeling are not regulated by the United States Department of Agriculture, while those that do are often poorly enforced. Here is how to evaluate which claims are meaningful and unenforceable and not worth the added expense that the trendy buzzwords imply.
As a health-conscious consumer, I always make it a point to read the labeling on chicken products when shopping at my local supermarket. Here are some important things to look for when reading supermarket chicken labeling:
- USDA Inspection: It’s important to look for the USDA inspection label, which indicates that the chicken has been inspected and passed by the United States Department of Agriculture.
- Type of Chicken: The label should indicate the type of chicken, such as whole chicken, chicken breasts, or chicken thighs. This can help you determine what dish you can prepare with the chicken.
- Freshness: Look for a “sell-by” or “use-by” date to ensure the chicken is fresh and hasn’t been sitting on the shelf for too long.
- Country of Origin: The label should indicate the country of origin of the chicken. Different countries have different standards for animal welfare and food safety.
- Free-Range: Look for labeling that indicates the chicken is free-range, meaning that the birds were allowed to roam outside and not confined to small spaces. This often results in a healthier and more flavorful chicken.
- Antibiotic-Free: Look for labeling that indicates the chicken is antibiotic-free. Overuse of antibiotics can lead to antibiotic resistance, harming human health.
- Organic: If you’re looking for chicken that is raised more sustainably and humanely, look for labeling that indicates it is organic. The chickens were raised on an organic diet without hormones or antibiotics.
By reading the labeling on chicken products, you can make an informed decision about the quality and safety of the chicken you’re purchasing. Paying attention to the details and aligning with your values and preferences is important.
What is Air Chilled Chicken?
“Air Chilled” chicken is a type of chicken processed using a method that involves cooling the chicken using cold air instead of water. Traditional chicken processing methods typically cool the chicken by being submerged in a cold water bath. However, with air chilling, the chicken is hung in a refrigerated room where cold air is circulated.
Air chilling is thought to offer several benefits over traditional water chilling methods. For example, air-chilled chicken may have a more natural flavor and texture, as it does not absorb excess water during cooling. Additionally, air chilling may be more environmentally friendly, as it uses less water and does not generate as much wastewater as traditional methods.
However, air-chilled chicken may be more expensive than conventionally processed chicken, as the method is more time-consuming and requires specialized equipment. Consumers concerned about their chicken’s quality and sustainability may consider air-chilled chicken a possible option.
Does USDA Organic Mean Anything?
Yes, the USDA Organic label means something. It indicates that the food or product has been certified by the United States Department of Agriculture (USDA) as meeting specific organic standards. The USDA Organic certification process involves strict regulations and guidelines that farmers and producers must follow to ensure that their products are grown or produced in an environmentally sustainable way and free from certain chemicals, pesticides, and genetically modified organisms (GMOs).
To be certified as organic, the farm or facility must undergo a rigorous inspection process to ensure they meet the USDA organic standards. This includes using natural fertilizers and pest control methods, avoiding the use of synthetic pesticides and fertilizers, and following specific guidelines for the treatment of animals.
While the USDA Organic label assures that the product meets specific organic standards, it’s important to note that organic does not necessarily mean that it is healthier or more nutritious. Additionally, organic products may be more expensive than conventionally grown or produced. It would help to research whether organic products meet their preferences and standards.
To be considered organic, a chicken must be fed food grown without pesticides, receive no antibiotics, and have at least some access to the outdoors. If a chicken meets these standards, it receives the label “USDA Organic.” “USDA Organic” is considered the gold standard for organic foods as it has been certified by the United States Department of Agriculture.
What Does Not Raised with Antibiotics Mean?
“Not raised with antibiotics” is a term used in food labeling to describe animal products raised without antibiotics. This claim aims to assure consumers that the animal was not given antibiotics for any reason, such as disease prevention or growth promotion.
However, it’s important to note that this claim does not necessarily mean that the animal was never given antibiotics at any point in its life. It means the animal was not given antibiotics during a specific period, such as during the growing or finishing phases.
It’s also important to understand that “not raised with antibiotics” does not necessarily mean that the animal was raised in a completely antibiotic-free environment, as there may be instances where antibiotics were needed to treat a sick animal.
You should read labels carefully and do your research to understand the specific meaning and standards behind this claim to make informed decisions about the food products you purchase.
“Raised no Antibiotics” should be an important term; unfortunately, the USDA does not enforce it. Some loopholes surround the term “raised without antibiotics,” including farmers who inject their eggs with antibiotics, not the chickens themselves, or feed their chickens feather meal laced with residual antibiotics from birds fed antibiotics. Be wary of this claim when you make your supermarket purchases.
What is Vegetarian-Fed vs. Vegetarian Diet?
“Vegetarian-fed” and “vegetarian diet” are terms often used in food labeling to describe the type of diet given to the animals used for food production, such as chickens or cows.
“Vegetarian-fed” generally means that the animals were fed a diet without animal products, such as meat or fish. This is often done to improve the quality and flavor of the meat and to meet the demand of consumers looking for meat from animals raised more ethically and sustainably.
On the other hand, a “vegetarian diet” generally means that the animals were fed a diet that is made up entirely of plant-based ingredients. This term often describes food products from animals raised using more strict animal welfare standards, such as free-range or pasture-raised farming methods.
It’s important to note that while “vegetarian-fed” and “vegetarian diet” may sound similar, they are not the same thing. The term “vegetarian-fed” does not necessarily mean that the animals were raised using ethical or sustainable practices or that they had access to outdoor space. It’s important to read labels and research to understand the exact meaning behind these terms and to choose food products that meet your preferences and standards.
These terms are not regulated by the USDA and could mean anything. Is the producer feeding their chicken cheap, poor-quality vegetarian items? You rely on the producer’s word that they are supplying you with a quality product, and you are not guaranteed to receive a healthier product.
What is Natural and All Natural?
The terms “natural” and “all-natural” are commonly used in food marketing, but their meanings can be ambiguous and vary depending on the context. The term “natural” generally indicates that a food has been minimally processed and contains no artificial ingredients or preservatives. However, there is no official definition or legal standard for the term “natural,” so it can be used in various ways.
Similarly, “all-natural” generally means that food does not contain synthetic ingredients, but this term has no official definition or legal standard. It’s important to read labels carefully, research the brand and product to determine the exact meaning behind these terms, and ensure that the food meets your preferences and standards.
For meat to be considered “natural” or “all-natural,” the USDA requires that no synthetic substances be added to a fresh meat cut. Thus, producers can raise chickens under bizarre circumstances, feed them the most unnatural diets, and inject them with broth during processing. The poultry could still fit the definition of “natural” or “all-natural,” so the buyer should understand what “Natural or “Natural” really means before making a purchasing selection.
Is All Chicken Hormone Free?
Yes, all chicken sold in the United States is hormone-free. The use of hormones in chicken production has been banned in the United States since the 1950s. Therefore, any claim on chicken packaging that it is “hormone-free” or “raised without hormones” is just a marketing tactic, as all chicken produced in the United States is free from added hormones.
However, it’s important to note that antibiotics may be used in chicken production to treat and prevent disease. Some producers may make claims about antibiotic-free or no antibiotics ever chicken. You must read the labels carefully and choose chicken that meets their preferences and standards.
The term “hormone-free” with chicken is a false assurance, as the USDA does not permit the practice of steroids or hormones in raising chicken.
Shopping for Supermarket Cuts of Chicken
Shopping for supermarket cuts of chicken can be a bit overwhelming, as there are many different options. Some common cuts of chicken you may find in the supermarket include boneless skinless chicken breasts, chicken thighs, and chicken drumsticks. When shopping for chicken, it’s important to pay attention to the color and appearance of the meat to ensure it is fresh and of good quality.
It’s also good to check the expiration date and choose the right cut for your recipe and cooking method. Additionally, it’s important to handle raw chicken carefully to prevent cross-contamination and to cook it to the appropriate temperature to ensure it is safe to eat. By following these guidelines, you can select the right cuts of chicken for your meals and ensure that your chicken is safe and delicious.
Compared to beef and pork, there are not many chicken cuts available to the consumer, making shopping for chicken much less confusing; now, with that said, there are still some important things to consider when buying chicken.
What Types of Whole Chickens are Commonly Available?
Whole chickens come in many sizes. Broilers and fryers are younger chickens that typically weigh between 2 1/2 and 4 1/2 pounds, while a roaster is an older chicken that weighs between 5 and 7 pounds.

When buying chicken, I recommend avoiding chickens that have been “water chilled” or “enhanced” (injected with a broth of flavoring). I find the meat unnaturally spongy and have a “fake” taste. Unsure if the bird you are considering has been “water chilled” or “enhanced”? Look for “water gain” on the label, as the USDA requires this to be disclosed.
Instead of “water chilled” or “enhanced,” look for a chicken that has been “air-chilled.” I find “air-chilled” chicken, without the excess water weight, to have much more of a natural texture while remaining juicy.
Different Cuts of Bone-in Chicken?
You can buy a whole chicken at the supermarket or purchase a whole cut-up chicken or parts. The issue with buying the cut-up chicken is it can sometimes be difficult to tell if the chicken has been butchered well. I recommend purchasing the whole chicken and butchering it yourself if you can spare the extra time.
The Difference Between Chicken Cutlet and Breast?
If you are buying boneless, skinless breasts at the market, be aware that breasts of different sizes are often packaged together and won’t cook through at the same rate. I recommend looking for a package where the breasts appear similar and then taking the time to pound them to an even thickness. To do this, place your chicken breasts in saran wrap and gently pound them with a mallet until they appear of even thickness.
Chicken cutlets are a slice of meat from the chicken breast. You can buy chicken cutlets at the store, but I don’t recommend them because they are often uneven and difficult to cook evenly. Instead, buy whole chicken breasts and cut your own, more even, cutlets.
Does Ground Chicken Taste Good?
Ground chicken is typically available either prepackaged or grounds to order. The prepackaged ground chicken is made of either white or dark meat, while if you get it ground to order, the choice of meat is up to you.
While dark meat is juicier due to its higher fat content, I’ve always preferred white meat’s consistency and flavor. I don’t generally purchase ground chicken, so you can experiment with which type of meat you prefer.
What Does Salting and Marinating with Brine do to the Chicken?
As an avid home cook, I’ve always been fascinated by the science behind cooking, and one thing I’ve always wondered about is the effects of salting and marinating with brine on chicken. Here’s what I’ve learned:
Salting chicken, either dry or in brine, can help tenderize and flavor the meat. Salt works to break down the proteins in the chicken, which can result in a more tender and moist end product. It also helps to enhance the natural flavors of the chicken.
Marinating chicken with brine can further enhance the benefits of salting. A brine is a solution of water, salt, and sometimes sugar or other flavorings, such as herbs or spices. The salt and other flavors can penetrate the meat by immersing the chicken in brine, resulting in a more flavorful and juicy chicken.
The brine solution also helps draw out any impurities in the chicken, resulting in a cleaner and better-tasting end product. The salt in the brine also helps to preserve the chicken, which can be especially helpful when cooking chicken for a longer period.
Salting Chicken
I like using kosher salt when salting chicken. Prepare it in advance so the meat stays juicy. When salt is put on raw chicken, juices are pulled to the top. The salt breaks down, melts, and releases liquid, creating a brine of its juice that the chicken ultimately absorbs.
Salting changes the makeup of the muscles, allowing the meat to retain more of its juices. Salting needs time. You can rush the process, but the wait will be worth it once you bite into that crispy golden skin.
|
Time | Kosher Salt | Method | |
| Whole Chicken | Min 6 hours or up to 24 hours | 1 tsp. Per lb. | Rub in salt equally inside the whole chicken’s body cavity and beneath the skin of breasts and legs, and let it rest in the refrigerator on top of a wire rack on top of a rimmed baking sheet. (Place in film wrap if salting for any time longer than 12 hours.) |
| Bone-In Chicken Pcs. | Min 6 hours or up to 24 hours | ¾ tsp. Per lb. | If using skin-on poultry, Rub in salt equally in the middle of the skin and the meat; make sure to leave the skin attached. (Place in film wrap if salting for any time longer than 12 hours.) then let it rest in the refrigerator on a wire rack and a rimmed baking sheet. |
Brining Chicken
Brining chicken works in pretty much the same manner as salting does. Salt in the brine pretty much seasons the poultry’s meat and starts to promote a physical change in the meat’s protein structure, as it tenderizes by creating gaps between the meat that fills up with brine water, which keeps the meat very juicy, tasty and flavorful.
Using brine works much faster than salt. It will also make lean cuts much juicer since it adds not just retains the moisture into the meat. Also, take note that brine helps the browning process as well also; you will need to make sure you have a brining container that will fit inside your fridge.
Do not Brine Water-Chilled Chicken. I prefer using table salt when making the brine; it dissolves much quicker when added to water. The chart below lists poultry items I typically will brine, with notes on how long to brine and the correct amount of water needed.
|
Time | Cold Water | Table Salt | |
| 1 chicken (3½ to 4 lb.) | ½ to 1 hour | 2 qt. | ½ c. |
| 2 chickens (3½ to 4 lb. ea.) | ½ to 1 hour | 3 qt. | ¾ c. |
| 4 lb. bone-in chicken pcs. (whole breasts, split breasts, leg quarters, thighs, and drum-sticks) | ½ to 1 hour | 2 qt. | ½ c. |
| 4 ea. boneless, skinless chicken breasts | ½ to 1 hour | 2 qt. | ¼ c. |
How to Truss a Chicken
Trussing a chicken is a technique used to secure the wings and legs of the chicken to the body to create a more compact and uniform shape. This can help the chicken cook more evenly, making it visually appealing. To truss a chicken, kitchen twine or string is typically used to tie the wings and legs together and to create a neat and compact package.
Trussing a chicken is a useful technique for roasting, as it can help the chicken retain its shape and prevent the wings and legs from burning. By mastering the technique of trussing a chicken, you can create a beautiful and evenly cooked chicken that will impress.
- To ensure the wings don’t burn, bend them slightly away from the body, then slide the wing tips under the neck area.
- Cross the ends of the drumsticks over one another and then secure them with twine using a double knot.
- Trim the excess twine from the drumsticks, leaving about 1/2 twine
How to Cut Whole Chicken into Parts
Cutting a whole chicken into parts is useful for anyone who wants to prepare a chicken for cooking. The process typically involves removing the legs, wings, and breast meat from the chicken and separating the meat from the bones. This can be done using a sharp knife or kitchen shears, requiring some basic chicken anatomy knowledge.
By cutting a whole chicken into parts, you can prepare the chicken for various cooking methods, such as roasting or grilling, and you can also save money by buying a whole chicken and portioning it yourself. Additionally, cutting a whole chicken into parts can allow you to use different parts of the chicken in different recipes, creating more variety in your meals.
- Removing the legs first makes butchering the chicken’s rest easier. First, locate the area where the leg attaches to the breast and cut through the skin. Next, pop the leg joint out of its socket using your hands, then continue to detach the leg from the body.
- Turn each leg quarter skin side down. Locate the small white fate line between the thigh and drumstick and cut through that joint using a sharp chef’s knife.
- Flip the chicken over and remove the wings by slicing through each wing joint, then remove the wingtips by slicing through the cartilage. You will find that most recipes that call for whole butchered chickens do not utilize the wings since they contain less meat than the other chicken pieces. I recommend freezing these pieces and using them to make chicken stock or bone broth later.
- Cut up the chicken’s backbone using kitchen shears to remove it. The backbone contains almost no meat and only gets in the way of butchering the breasts. The backbone, like the wings, is good for making chicken stock.
- Flip the chicken skin side down and look for the thin white line down the breastplate center. When you locate this line, cut through it using a chef’s knife and lay each split breast skin side up.
- Using a chef’s knife, cut through each skin side up chicken breast crosswise due to the chicken breasts being fairly large; cutting them in half speeds up cooking time.
How to Butterfly Whole Chicken
Butterflying a whole chicken is a technique used to flatten the chicken by removing the backbone to cook it more quickly and evenly. To butterfly a chicken, the backbone is typically removed using a sharp knife or kitchen shears. Once the backbone is removed, the chicken is laid flat and can be seasoned and cooked using various methods, such as grilling or roasting.
Butterflying a whole chicken can help to reduce cooking time and result in a more evenly cooked bird. It’s also a great way to infuse the chicken with flavors by adding marinades or seasonings. By mastering the technique of butterflying a whole chicken, you can create delicious and flavorful meals that are sure to impress.
- Place the chicken breast side up on your cutting board and use the heel of your hand to press down on the breastbone until the chicken is flattened. If you’ve flattened the chicken correctly, you will hear a crack in the breastbone.
- Now place the chicken breast side down and use kitchen shears to cut along each side of the backbone from the tail end through the neck. Removing the backbone allows you to flatten the chicken, and the kitchen shears make it fast and easy to accomplish.
- Cover the butterflied flattened chicken with plastic wrap and use a mallet to pound the chicken breast meat to an even thickness.
- Detach, but don’t remove, the chicken skin from the membrane to make room for compound butter.
- Scoop the compound butter onto a spoon and slide it under the breast skin. Using your fingers, remove the butter from the spoon and spread the butter evenly under your fingers’ breast skin.
How to Split Bone-in Chicken Breasts
Split bone-in chicken breasts are a popular cut of chicken that includes both the breast meat and the bone. They are typically split down the middle, each half including one bone and one breast. This chicken cut is often used in recipes that require bone-in meat, as the bone can help to add flavor and keep the meat tender during cooking.
Split bone-in chicken breasts are often roasted, grilled, or pan-fried and can be seasoned with various herbs and spices to add flavor. This chicken cut is a popular choice for those looking for a lean protein source, as it is low in fat and protein.
- Place the chicken breast skin on the cutting board and center your knife on the breastbone. Apply pressure to cut through and separate the breast into two halves.
- Using kitchen shears, trim away the rib section of each breast using the vertical line of fat from the end of the breast up to the wing socket as your guide. Removing the ribs allows the breasts to lay flat in a pot or a skillet for even cooking.
- Using your kitchen shears or chef’s knife, trim away any visible fat from the chicken breasts before cooking so your pan does not turn greasy.
How to Make Chicken Breast Cutlet Fillets
Chicken breast cutlet fillets are boneless chicken breasts pounded thin and often coated in breadcrumbs or flour before cooking. They are versatile ingredients that can be used in various dishes, such as chicken parmesan or as a topping for salads or sandwiches.
Chicken breast cutlet fillets are typically quick and easy to cook, as they are thin and cook through relatively quickly. They are a popular choice for those looking for a lean protein source, as they are low in fat and protein.
- Remove the thin strip of meat attached to the breast called the tenderloin because it will likely come off during cooking anyway. Tip* I find it easier to fillet chicken breasts cooler, so I recommend placing chicken breasts on a plate in the freezer for about 15 minutes to firm up.
- Lay the chicken breast on a smooth cutting board. Rest your hand on the chicken and use a chef’s knife to cut the chicken horizontally. You will find that each cutlet will be about 1/2 inch thick.
- Place the smooth side-down cutlets on a large sheet of plastic wrap. Cover the chicken with the second piece of plastic wrap and gently pound it with a mallet until the cutlets are of even thickness.
Because chicken breasts are thicker on one end than the other, pounding the chicken to an even thickness helps to ensure even cooking.
Know When Chicken Finished Cooking
Knowing when a chicken is finished cooking is important for ensuring it is safe to eat and cooked to the desired level of doneness. Check the internal temperature using a meat thermometer to tell if a chicken is finished cooking. The temperature should reach 165°F (74°C) to 175°F (80°C) in the thickest part of the meat, including the breast, thigh, and wing.
Additionally, the juices should run clear, and the meat should be firm and not pink. Let the chicken rest for a few minutes before carving or serving to allow the juices to redistribute and the meat to become more tender. Following these guidelines ensures that your chicken is perfectly cooked and ready to be enjoyed.
Thigh Meat finished cooking.
Insert your thermometer into the area between the drumstick and the breast, ensuring not to hit the bone. Thigh meat is considered done at 175°F (80°C).
Breast Meat finished cooking.
Hold your thermometer parallel to the chicken and insert it from the neck end. Breast meat is considered done at 165°F (74°C).
All Chicken Parts finished cooking.
Lift each piece of chicken using a pair of kitchen tongs and insert your thermometer into the thickest portion of each piece. White meat should register at least 165°F (74°C), while dark meat should register at least 175°F (80°C) for the mean to be considered done.
How Do You Carve a Chicken?
Carving a chicken is essential for anyone who wants to serve a whole chicken. The process typically involves removing the legs, wings, and breast meat from the chicken and separating the meat from the bones. The key to carving a chicken is to use a sharp knife and to work carefully to avoid tearing the meat.
By following a few simple steps and using the right technique, you can create beautiful, evenly sliced portions of chicken that are ready to be served. Carving a chicken can be a great way to impress your guests and serve a delicious and visually appealing meal.
For Roasted Chicken:
- Cut through the skin between the leg and the breast using a chef’s knife. Pull the leg quarter away from the chicken’s body while cutting, separating the joint by pressing the leg out to the side and pushing up on the joint. Carefully cut through the joint using your kitchen shears to remove the leg quarter. Once finished, repeat this process on the other side of the chicken.
- Turn the leg quarter skin side down and cut through the joint connecting the drumstick to the thigh.
- Cut down one side of the breastbone and pull the meat away from the breastbone as you cut. Follow the bone’s curved shape to release the meat, again using your free hand to pull the meat away from the bone. Finally, remove the wings by cutting through the wing joints.
- Slice the breast crosswise on an angle (also called “on the bias”)
For Butterflied Chicken:
- Place the chicken skin-side down on your cutting board. Using kitchen shears, cut through the breastbone. The chicken was already flattened, and the breastbone was broken during prep, so this should be easy.
- Now that the breastbone has been split, only the skin holds the chicken pieces together. Use your kitchen shears to remove each leg quarter and separate each leg and thigh from each breast and wing.
- To separate the thighs from the drumsticks, turn the meat skin side down and slice through the thin, fat line between the thigh and the drumstick.
- Insert your chef’s knife into one side of the breastbone and follow the bone’s curved shape to release the breast meat from the breastbone.
- Cut through the joint’s wing using your chef’s knife to remove the wings. This should leave you with a boneless, skinless chicken breast.
- Slice each breast crosswise on an angle, making for slices about 1/2 inch thick.